 盘古BPM交流群号:963222735
在使用spring boot 的时候,我们只需要注入Environment类,即可获取到所有的配置资源,本文我们重点看一下Environment类加载配置资源的整个过程。
Environment类注入演示
@RestController
@SpringBootApplication()
public class Application {

	@Autowired
	Environment environment;
	@RequestMapping("/")
	String index() {
		System.out.println(environment);
		return "xxxxxxxxxxxxx";
	}
	public static void main(String[] args) {
		SpringApplication springApplication = new SpringApplication(Application.class);
		springApplication.addListeners(new ShareniuApplicationStartedEventListener());
		springApplication.run(args);
	}
}
启动程序,并访问http://127.0.0.1:8080/,控制台的输出信息如下:
StandardServletEnvironment {activeProfiles=[], defaultProfiles=[default], propertySources=[commandLineArgs,servletConfigInitParams,servletContextInitParams,systemProperties,systemEnvironment,random]}
确实可以通过Environment实例对象获取所有的配置资源。
spring boot Environment内部实现机制
首先看一下SpringApplication类的构造函数如下:
public SpringApplication(Object... sources) {
initialize(sources);
}
接下来,继续跟进initialize方法,如下所示:
private void initialize(Object[] sources) {
if (sources != null && sources.length > 0) {
this.sources.addAll(Arrays.asList(sources));
}
this.webEnvironment = deduceWebEnvironment();
setInitializers((Collection) getSpringFactoriesInstances(ApplicationContextInitializer.class));
setListeners((Collection) getSpringFactoriesInstances(ApplicationListener.class));
this.mainApplicationClass = deduceMainApplicationClass();
}
我们将关注点放到deduceWebEnvironment方法中,该方法的处理逻辑如下所示:
private static final String[] WEB_ENVIRONMENT_CLASSES = { "javax.servlet.Servlet",
"org.springframework.web.context.ConfigurableWebApplicationContext" };
private boolean deduceWebEnvironment() {
for (String className : WEB_ENVIRONMENT_CLASSES) {
if (!ClassUtils.isPresent(className, null)) {
return false;
}
}
return true;
}
webEnvironment变量用来标示当前的项目工程是否是web工程,这个比较重要。
springApplication.run(args)
springApplication.run(args)方法如下所示:
ConfigurableApplicationContext context = null;
context = doRun(listeners, args);
我们重点看doRun方法,核心代码如下:
ConfigurableEnvironment environment = getOrCreateEnvironment();
其中getOrCreateEnvironment方法的定义如下:
private ConfigurableEnvironment environment;
private ConfigurableEnvironment getOrCreateEnvironment() {
if (this.environment != null) {
return this.environment;
}
if (this.webEnvironment) {
return new StandardServletEnvironment();
}
return new StandardEnvironment();
}
如果environment不为空,则直接返回,如果webEnvironment为true,则实例化StandardServletEnvironment类。因为我们是web工程,所以肯定会实例化StandardServletEnvironment类的,该类的类图如下所示:
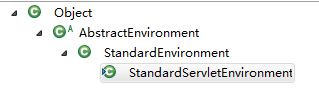
实例化StandardServletEnvironment类的时候,会一层一层的向上实例化其父类,所以会实例化AbstractEnvironment类,AbstractEnvironment类中的构造函数如下:
public AbstractEnvironment() {
customizePropertySources(this.propertySources);
if (this.logger.isDebugEnabled()) {
this.logger.debug(format(
"Initialized %s with PropertySources %s", getClass().getSimpleName(), this.propertySources));
}
}
上述代码,两个核心步骤:
第一调用customizePropertySources方法,
第二输出日志。
因此关注点放置到customizePropertySources方法的处理逻辑即可。跟进该方法发现customizePropertySources方法为空实现,如下所示:
protected void customizePropertySources(MutablePropertySources propertySources) {
}
customizePropertySources方法为protected ,换言之,子类可以对该方法进行实现,因为我们看一下StandardServletEnvironment类中的customizePropertySources方法,如下所示:
protected void customizePropertySources(MutablePropertySources propertySources) {
propertySources.addLast(new StubPropertySource(SERVLET_CONFIG_PROPERTY_SOURCE_NAME));
propertySources.addLast(new StubPropertySource(SERVLET_CONTEXT_PROPERTY_SOURCE_NAME));
if (JndiLocatorDelegate.isDefaultJndiEnvironmentAvailable()) {
propertySources.addLast(new JndiPropertySource(JNDI_PROPERTY_SOURCE_NAME));
}
super.customizePropertySources(propertySources);
}
在这里注意一点:
propertySources对应AbstractEnvironment类中的propertySources变量如下所示:
private final MutablePropertySources propertySources = new MutablePropertySources(this.logger);,如果对于这个有疑问可以参考前面的方法调用逻辑。
继续收看上面的方法:添加了servletConfigInitParams、servletContextInitParams、jndiProperties,然后调用父类的customizePropertySources方法,其父类为StandardEnvironment,方法实现如下:
protected void customizePropertySources(MutablePropertySources propertySources) {
propertySources.addLast(new MapPropertySource(SYSTEM_PROPERTIES_PROPERTY_SOURCE_NAME, getSystemProperties()));
propertySources.addLast(new SystemEnvironmentPropertySource(SYSTEM_ENVIRONMENT_PROPERTY_SOURCE_NAME, getSystemEnvironment()));
}
上述代码中添加systemProperties以及systemEnvironment。
getSystemProperties方法
public Map<String, Object> getSystemProperties() {
		try {
			return (Map) System.getProperties();
		}
		catch (AccessControlException ex) {
			return (Map) new ReadOnlySystemAttributesMap() {
				@Override
				protected String getSystemAttribute(String attributeName) {
					try {
						return System.getProperty(attributeName);
					}
					catch (AccessControlException ex) {
						if (logger.isInfoEnabled()) {
							logger.info(format("Caught AccessControlException when accessing system " +
									"property [%s]; its value will be returned [null]. Reason: %s",
									attributeName, ex.getMessage()));
						}
						return null;
					}
				}
			};
		}
	}
上述代码真简单的很,直接调用System.getProperties()。
getSystemEnvironment方法
public Map<String, Object> getSystemEnvironment() {
		if (suppressGetenvAccess()) {
			return Collections.emptyMap();
		}
		try {
			return (Map) System.getenv();
		}

	}
根据suppressGetenvAccess方法的返回值获取不同的逻辑,如果suppressGetenvAccess方法的返回值为true,则返回一个空集合,否则调用 System.getenv()并返回。
suppressGetenvAccess方法
public static final String IGNORE_GETENV_PROPERTY_NAME = "spring.getenv.ignore";
protected boolean suppressGetenvAccess() {
		return SpringProperties.getFlag(IGNORE_GETENV_PROPERTY_NAME);
	}
上述代码中从SpringProperties类中获取spring.getenv.ignore值,接下来我们看一下SpringProperties类。
SpringProperties类
public abstract class SpringProperties {
	private static final String PROPERTIES_RESOURCE_LOCATION = "spring.properties";
	private static final Log logger = LogFactory.getLog(SpringProperties.class);
	private static final Properties localProperties = new Properties();
	static {
		try {
			ClassLoader cl = SpringProperties.class.getClassLoader();
			URL url = (cl != null ? cl.getResource(PROPERTIES_RESOURCE_LOCATION) :
				ClassLoader.getSystemResource(PROPERTIES_RESOURCE_LOCATION));
			if (url != null) {
				logger.info("Found 'spring.properties' file in local classpath");
				InputStream is = url.openStream();
				try {
					localProperties.load(is);
				}
				finally {
					is.close();
				}
			}
		}
		catch (IOException ex) {
			if (logger.isInfoEnabled()) {
				logger.info("Could not load 'spring.properties' file from local classpath: " + ex);
			}
		}
	}
}
看到上面的静态代码块我们明白了,可以再classpath路径中定义一个spring.properties文件并进行spring.getenv.ignore属性的定义,非常的明了。
MutablePropertySources类中的addLast方法
接下来继续跟踪MutablePropertySources类中的addLast方法:
public void addLast(PropertySource<?> propertySource) {
removeIfPresent(propertySource);
this.propertySourceList.add(propertySource);
}
removeIfPresent方法顾名思义,如果存在则从集合中移除,然后将其添加到propertySourceList集合中。
PropertySource类
PropertySource类的核心定义如下:
public abstract class PropertySource<T> {
protected final Log logger = LogFactory.getLog(getClass());
protected final String name;
protected final T source;
}
注意:该类是一个泛型类,定义了名称以及T。
那我们思考一下上面的代码:removeIfPresent方法如何移除PropertySource类型的元素,这个我们最关心,因为T是不确定的,泛型。所以该类重写了equals以及hashCode方法,代码如下:
@Override
	public boolean equals(Object obj) {
		return (this == obj || (obj instanceof PropertySource &&
				ObjectUtils.nullSafeEquals(this.name, ((PropertySource<?>) obj).name)));
	}
	/**
	* Return a hash code derived from the {@code name} property
	* of this {@code PropertySource} object.
	*/
	@Override
	public int hashCode() {
		return ObjectUtils.nullSafeHashCode(this.name);
	}
所以移除的元素以name为准。
至此StandardEnvironment的初始化以及讲解完毕.
下文,我们详细分析如何自定义动态加载配置资源。
转载请注明:分享牛 » spring boot Environment源码分析